Friday, August 30, 2024

Product Review: the Mad Pad

(Disclaimer: at the end of my chat with Michael Beauclerc, founder of MadPads, Michael offered to send me one of his regular snare pads free of charge, so that I could test and review it. I did not solicit this offer. It was his idea. I’m grateful for the opportunity to chat with him, and grateful for the chance to test and review his pad.)


Construction of the Mad Pad


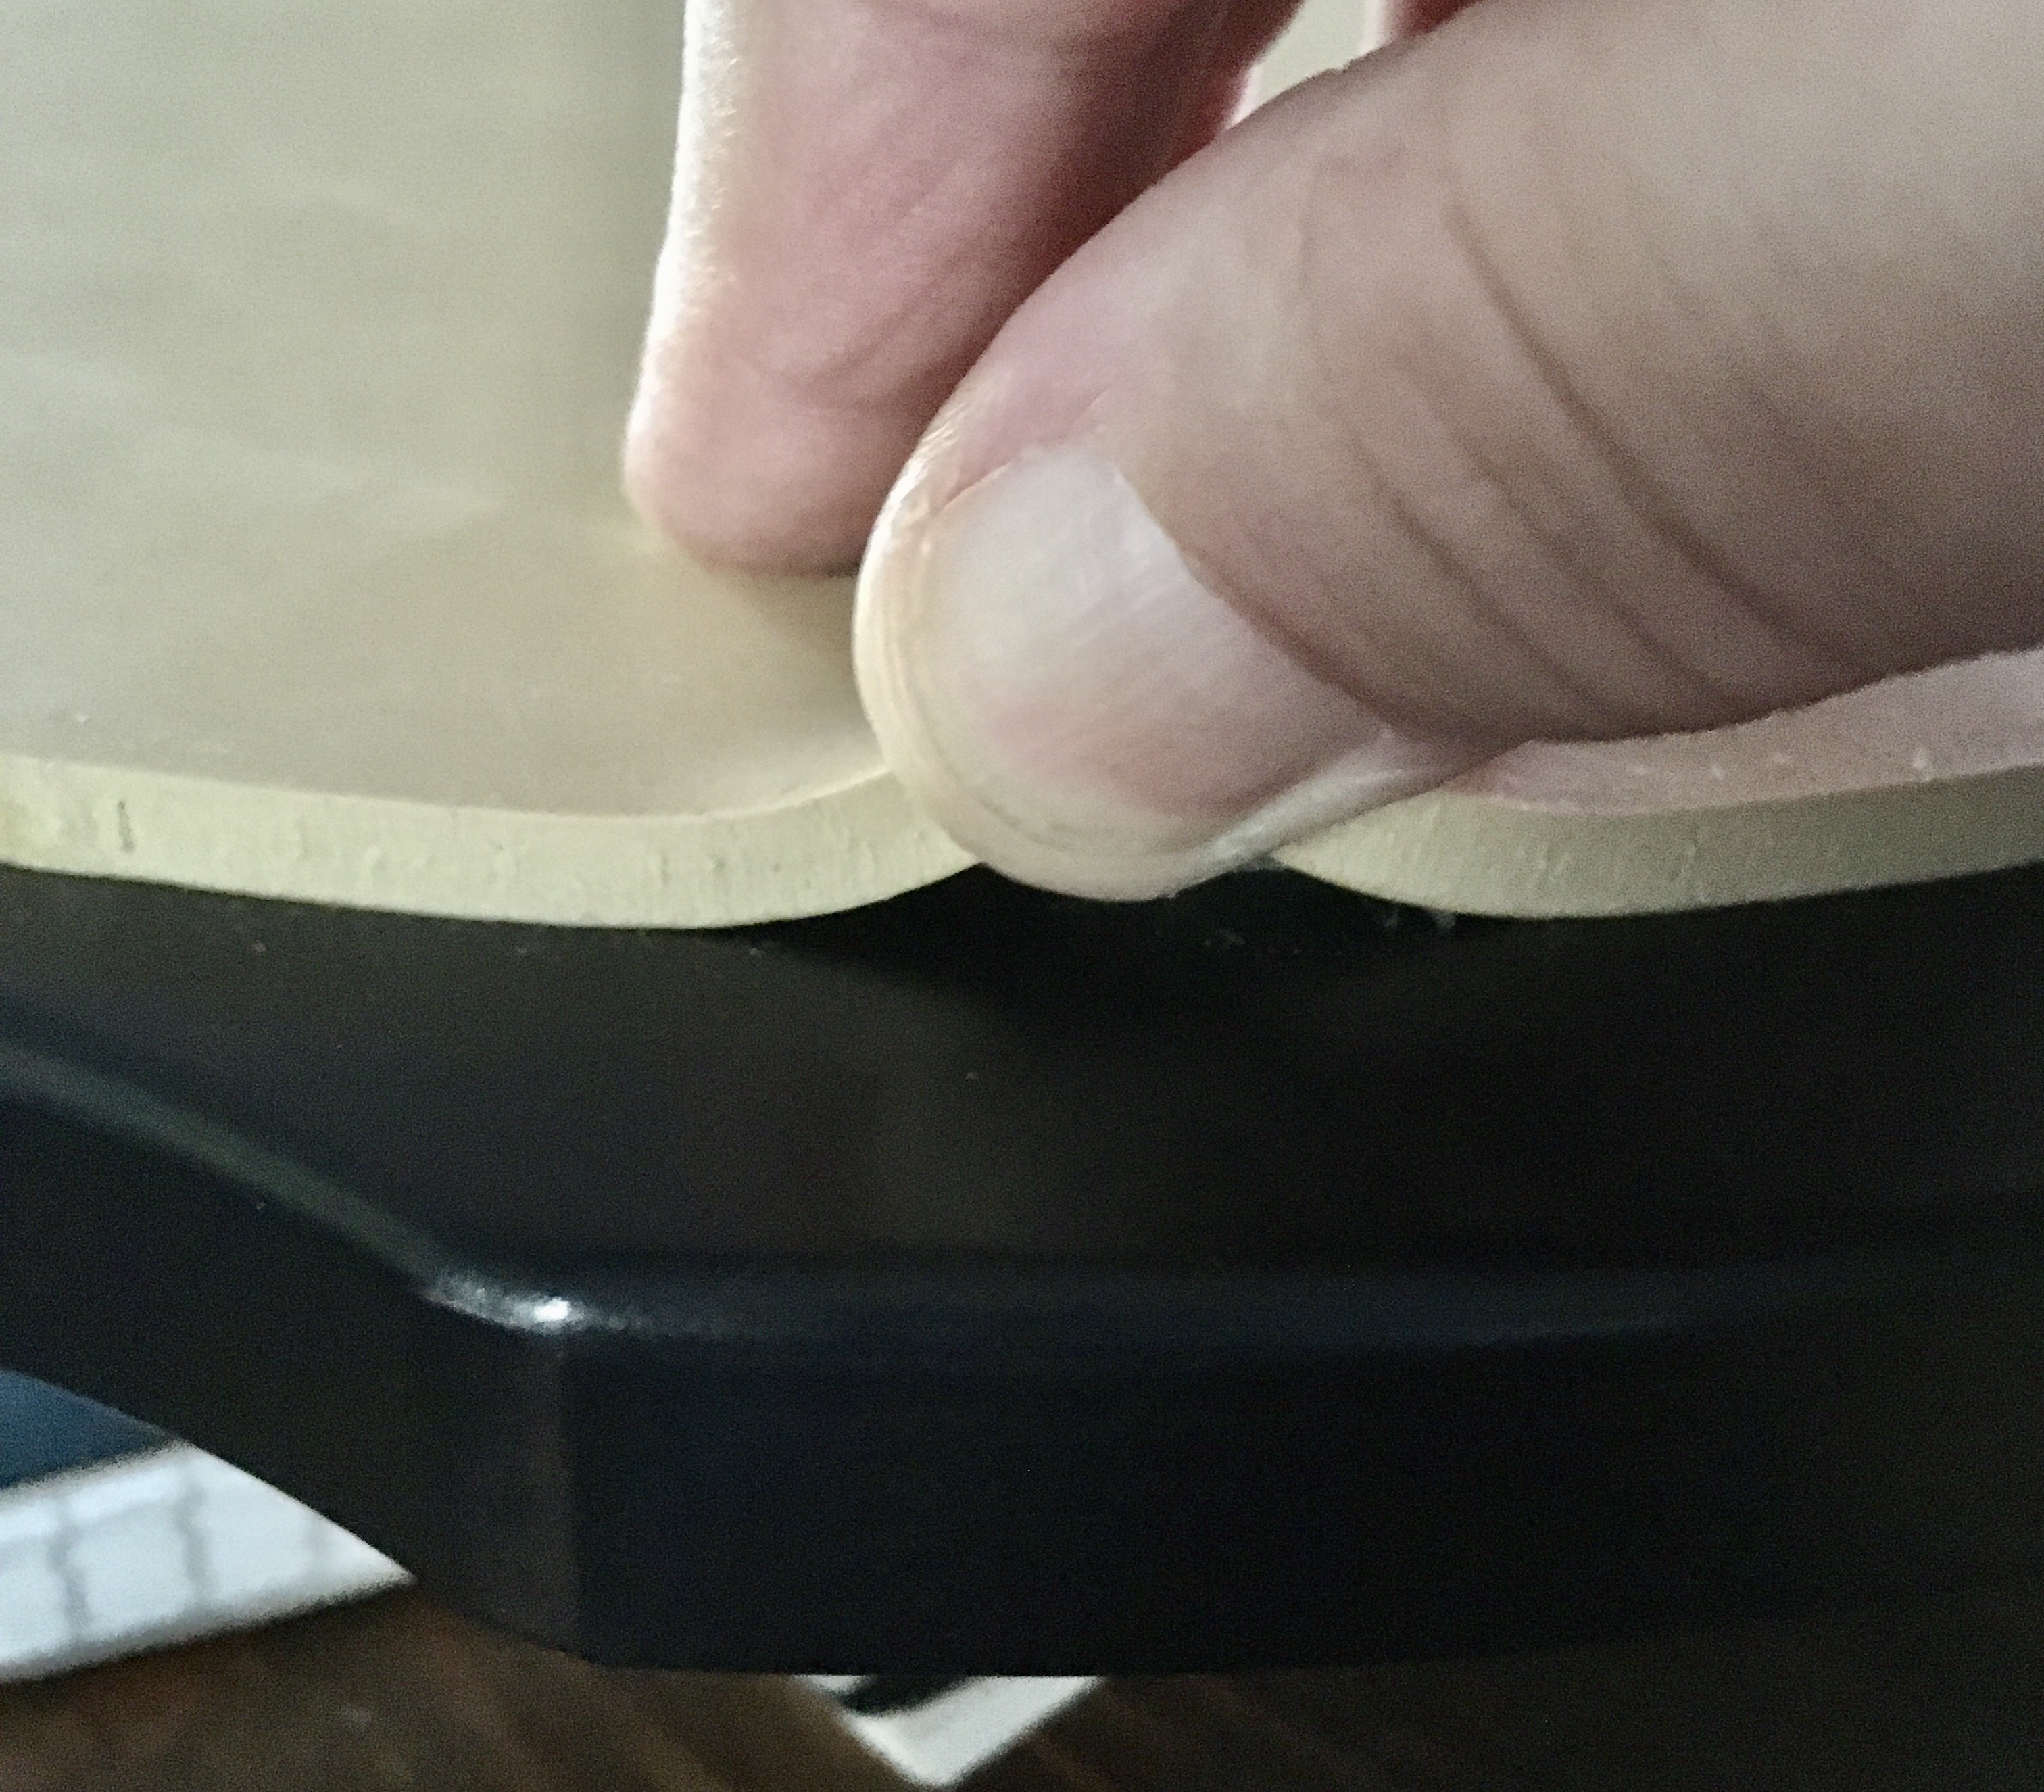
The playing surface is roughly 1/4” gum rubber adhered to an MDF base. Bottom surface is a white material that looks and feels like a more dense, closed cell styrofoam sheeting, similar to that used in wrapping fragile items for shipping.

Michael informed me this material is called 2A1, is far more robust than ordinary styrofoam wrapping material, and is used as a material for gaskets. 

More info here:


https://www.atlanticgasket.com/ASTM-D-1056-information.html


Feel free to dive in and get your geek on.


Bottom layer was scuffed and peeling right out of the box.

The glue was spread very thinly and the layer peeled up with almost no effort.

It does function as a sort of nonskid surface. Not as nonskid as a mousepad type of rubber might be. I’ll live with it for now, and if it shows signs of rapid deterioration n the future I’ll replace it with mousepad material and super glue gel.


When I shared this info with Michael, he apologized for this, saying that the other six pads in this batch passed muster with full adhesion, and he must have missed this one.


I have yet to come across any detailed specs for the “Deluxe MDF” that Michael referred to in our initial chat, only the generalized explanation I found (and linked in my previous post). But I will keep researching and let you know later if I discover anything more.


The base is painted quite nicely, and looks like a reasonably durable coating. You can get the Mad Pad in White Chocolate, Stiff Key Blue, or the basic black shown here.


The top layer also showed signs of peeling, though only at the edge in a few places, and only a tiny bit. Not sure if a different glue was used here, or simply a greater amount of the same glue.


The accompanying info sheet offers instructions for care:


I am still coming to terms with an instruction sheet that tells me to simply re-glue edges that peel up on a $65 pad. I’m willing to own the possibility that, due to my lifelong history as a maker, recycler and scavenger, my idea of pricing-versus-value needs some adjustment in 2024.


Playing the Mad Pad


My previous experiences with gum rubber practice pads have included a first generation Xymox (with no snare sound, dense — Premium? — MDF base and 1/8” rubber), the first and second generations of the Vic Firth Heavy Hitter pads (in both thicknesses, with what is likely a regular MDF base; and I’m not convinced that the gum rubber playing surface didn’t change between those two generations. I have not yet tried the 2024 update); and the vintage RealFeel tan pad on a regular MDF base.

Of these three, I liked playing the tan RealFeel and the first generation Stockpad the best, and everything else not so much.


The Mad Pad uses a gum rubber surface that is roughly 1/4” thick (the exact measurement, being Canadian, is Metric and also a proprietary secret, but 1/4” is close enough). For reasons I’m not exactly sure of, my hands greatly prefer the feel and response on this pad over that of either previous generation of the VF Stockpad. I suspect this may have something to do with the density of the MDF base. The MDF base on the Mad Pad feels more dense, and is a little heavier by weight as well. The sound has a nice depth, a sense of midrange tone, that I don’t find on the VF pads. It also gives off a liveliness that I never found on the RealFeel pad as well. If I were going to use a gum rubber pad as my primary practice pad**, it just might be the Mad Pad.


(** My primary, daily player pads are all tunable, with mylar heads. They provide a feel that’s closest to an actual drum, and are easier on my arthritic hands. However, they generally don’t travel very well, so when I need to take a pad along with me, it will invariably be some kind of rubber pad.)


The three carve-outs in the sides of the base allow for easy use in a snare stand (remember to lower the stand a little when using this pad, as the smaller 13” diameter will raise the height compared to your waist). Because the overall height of the pad is only an inch at most, you may want to look around for a basket with shorter feet. My go-to snare stand has pretty long feet and if I’m not paying attention, they stick up enough above this pad that I can catch it with a drum stick or the edge of my shirt. (New Mad Pads come with the helpful decal referenced in my previous post; point that decal and away from you and center it between two feet in the basket, so the third foot is facing you directly. This should help you avoid snags or unwanted stick bumps.)


Final thoughts: this is a really nice feeling and sounding practice pad. The pad’s weight puts it between the VF Heavy Hitter pads and the older tan RealFeel, and is not an unreasonable weight to carry in a backpack. 

That said, some construction choices and out-of-the-box realities give me pause, and I hope that future editions of the pad will take these into consideration. 


As I said before, as a lifelong scavenger, recycler and maker — and someone who’s over forty — I admit to having a slightly warped sense of things when it comes to price-versus-value. 

You and your wallet are the best judge of what an acceptable ratio is for you. 

$90 CA equals roughly $66 US today. 


We are at the beginning of a new school year. If you’re heading back to school, practice smart, pay attention and be kind to the people around you.

Happy chopping!


Wednesday, August 28, 2024

Interview: Michael Beauclerc, Mad Practice Pads

mb edmonton edit crop

(Photo of Michael Beauclerc from Canadian Drumline Association)

Michael Beauclerc has established a diverse and exciting career as a professional drummer, percussionist, composer, and author in Canada. He is also a busy marching percussion clinician for Yamaha Canada, having performed over 140 clinics from coast to coast as part of the "Start the Groove" campaign. Currently, Michael is the percussion head of the St. Michael's College School Drumline in Toronto, and a consultant and composer for several additional scholastic drumlines in Ontario. His books “The Mad Practice Pad” and “Developing Modern Drumlines” have become the literal foundations for Canadian drumlines and marching percussion instructors. For more information or to contact Michael, please visit www.michaelbeauclerc.com  (from http://ca.yamaha.com/en)

***********

I had been following the trajectory of Mad Pads for a couple of years, when I decided to take a closer look at their web site.
The pad’s design and construction, though deceptively simple, reflect numerous decisions that had to be made along the way in order to end up with what Michael calls, “just a really nice pad.”

I reached out through the contact form at the site to ask a few questions about the design, construction and proper care of Mad Pads, and was pleasantly surprised when only a few days later, Michael replied in an email with an offer of a live video chat. That chat, conducted online between our respective homes in Toronto and Portland, became this interview.

***********

BH: With so many pads already on the market, what inspired you to make and sell your own design?

MB: I grew up playing the old RealFeel tan rubber pads, so I was used to that feel and liked it. I still have my old RF pad around here — I played it so much that I sort of wore out the rubber! During the pandemic, I was looking around for things to do while the schools were closed and I couldn’t teach in person.

I had worn out my old Yamaha tenor pad, which I believe had actually been made for them by Xymox. I asked them and my other drum sponsors if they could make me a new one, and they all said no. The pandemic was creating problems everywhere with access to materials and slowdowns in production.

(Photo: Mad Pads Tenor pad.)

I’d already entered the instructional book market with a couple of self-published books. At one point, I’d even managed to get distribution, but the company tanked and I was back to doing things on my own. I have some woodworking knowledge — I’d spent time on a family farm and so I began experimenting with making pads. I wanted a solid pad that was made of quality materials sourced as locally as possible, that would stand up to the demands of the daily player. As a tenor player, I found that modern tenor pads were terribly expensive but didn’t always conform to the right standard and shape to provide the player with a good practice surface. Also, in Canada most schools march with the smaller tenors, so I wanted a pad that would approximate that size, instead of the larger tenor pads commonly found among US-based manufacturers.

I started by making pads at home, and eventually transitioned to making them on my uncle’s farm outside of Toronto. He was a custom kitchen designer and builder, and had all the tools available.

When schools began opening up again and I returned to teaching, I began showing my pads to others, and began taking orders for small runs. Then, I started taking larger group orders for schools. (If you check my Instagram page, you’ll see in the early days Mad Pads could be made in any color, and group orders in a school’s colors was a big part of the business in the early days.) I began with tenor pads, then started making snare pads as well.

I experimented with different materials for the base, including MDF and Baltic Birch.
Regular MDF is nasty stuff, filled with chemicals. It’s also cheaper, which is why many companies producing thousands of pads use it. Baltic Birch is amazing, fabulous stuff to work with, but it was so expensive that I couldn’t really sell enough pads to make it worthwhile, even on a small scale. Finally, I found a Premium MDF which uses far fewer chemicals and is more sustainably produced - and I was able to find a source that wasn’t located overseas. It’s more expensive than regular MDF and less costly than birch, and works well for my purposes.

[Ed. note: I researched "Premium MDF" at multiple sites and was unable to find a clear, concise explanation that matched Michael's assessment. Georgia-Pacific, a company my family has some historic connection to, provides a short, non-technical explanation of what Premium MDF is. G-P's site includes the statement that [theirs, at least] is made using NAF, or No Added Formaldehyde, resin. If that's true, then it's safer than regular MDF. Unfortunately, I have no way to test that.
Also, remember that in my earlier post about MDF, nearly every living thing emits a tiny amount of the stuff, so determining how much less is a good amount less will probably be imprecise and even subjective for the layman. If you have connections to the wood products industry, feel free to dive deeper.]


(MB, continued:) The gum rubber is sourced from South America — not local but probably as close as I can find in that respect — and it’s processed and distributed by a Canadian facility that's locally owned and operated.

After the first quantity orders were sent out and more people saw and tried out the pads, demand went up. It got to the point where I would teach, then drive out to my aunt and uncle’s farm and work in the shop and then go back to town and resume teaching. I was cutting rubber rounds by hand using tin snips, and painting and gluing each pad myself. It took a lot of my time and energy to do everything. As schools opened up and my teaching schedule approached what it had been pre-lockdown, it became harder to sustain a good time balance. At some point, I was cutting wood for pads in the barn while my aunt’s horse strolled past the window and I realized that I could not keep going this way. So I found a local woodworker who lives about an hour from me, and he was willing to take on the cutting of the bases in larger quantities for me. Then I found another fellow an hour in another direction from me who could machine cut the rubber (and also supply and cut) the foam base material in greater quantities. Finally, I have a student who lives not far from the woodworker, so when he comes for his lesson he stops there first to pick up the next batch of prepared pad bases, and delivers them to my house.

(Photo: Mad Pads snare pad)

BH: There are so many different ways and materials out there with which you can make a practice pad. Why gum rubber?

MB: I like the feel of gum rubber. And so many of the cheaper pads are made with some kind of neoprene, which can be dyed any color, is made overseas and is chemically just gross for the environment and your health. Plus there are a million pads now that basically come from Kerplastikan [Ed. — Michael's word, not mine] and they’re not even that good. My goal is simply to make a really nice pad, and by keeping it simple and as sustainably sourced as possible I think I’ve achieved that.

BH: Tell me about your new Cicada pad. It’s a pad with an approximation of a snare drum sound. In the video on your site, there is no view of the underside of the pad. Why is that?

MB: I spent a lot of time experimenting with various sizes and thicknesses of metal plates and the size and depth of the recessed area for the snare beads until I hit upon something I liked.**
Then, I decided that I wanted that mechanism to be non-alterable by a student. So instead of nuts that could be fiddled with, I covered the entire metal panel with foam and the Mad Pads logo sticker, essentially sealing the mechanism from adaptation.

An interesting note: When I went to buy the ball bearings for the mechanism, in Canada you need to be walked to the locked compartment where those things are stored, because they’re considered a weapon. (In Canada, guns are for hunting. We see police officers carrying guns and it gives us pause, you know, because openly carrying a gun just isn’t done here.)

BH: did you experiment with different sizes of ball bearing?

MB: No, I didn’t. I used what was readily available and found that it worked well.

BH: I noticed that your pad has three full indentations for the arms of a snare stand to rest in so the pad will stay put in the stand. You also have a decal on one side of the base and you’ve positioned it quite intentionally. Tell me more about that.

MB: When students put their pad into a snare stand, they tend to point one arm away from them and have the remaining two arms pointing towards them, but those two arms line up with where their wrists and sticks would go, interfering with the strokes. I wanted to make the indentations for the stand really obvious, and provide a firmer grip for the pad. But I also wanted to educate students that they should aim one arm towards themselves, instead of away from themselves. The decal should be located between the two arms that face away from the student. It’s a visual aid.

BH: What’s coming up for you, besides a busy teaching and performance season?

MB: In the past, I relied more often upon others to create a great deal of my digital content. Now that I no longer have to make every pad from scratch I can devote more time to creating more of my own digital content, including instructional content based on material in my books. I’m also looking to expand the marketing and distribution of my books. Now that things are opened back up, I look forward to doing a lot more teaching and performing, while continuing to improve Mad Pads where and when appropriate.

BH: Last question — what’s the best way to care for a gum rubber practice pad?

MB: With each Mad Pad there’s a little care-and-feeding sheet that explains how easy it is to make the pad last longer. First and foremost, don’t leave it out in the sun! Ultraviolet rays are the single most damaging thing for gum rubber, so keep it away from the windows and out of direct sunlight as much as possible. And if you spill something, wipe it up with a damp cloth and let dry — again, out of direct sunlight.

***********
[NOTE** While he didn’t say it directly, Michael alluded to the fact that his design for the snare sound is one of many adapted from the original design, which was first patented by Kevin M. Heuerman (founder of Xymox) in May 2000. That patent (https://patents.google.com/patent/US6239340B1/en) expired in 2020 and has never been renewed, freeing other makers to copy and/or improve upon the design as they see fit. Mad Pads isn’t the first company to adapt the design, and I doubt they’ll be the last.]

Mad Pads can be found online at https://madpracticepads.com/

US shoppers: Remember that all prices are listed in Canadian dollars, so don’t freak out. The regular Mad Pad costs $90 CA, which this week translates to roughly $66 US.

************
Coming soon: A review of the Mad Pad here on the Drumlove blog.

Sunday, August 25, 2024

More adventures with Beetle Percussion: rescue pads

I’ve been making it a point lately to search for used Beetle pads and snap them up.

Why?

Beetle Percussion is a guy making practice pads, one at a time, in his garage. 

Each pad is craftmade from the most sustainable materials available, and sourced as close to home as possible. The result is a pad that is solid, sounds and feels great, and is beautiful to look at too.

Beetle Percussion goes into great detail about the dimensions and construction of each pad model, and you can learn more at their web site.

My most recent finds — I call them Rescue pads — are below.

1. Ash Pad. This was advertised by the previous owner as a Grass Pad, which is a different animal altogether. So when it arrived, I was really confused. I confirmed with Bradley Lomax at Beetle that this is, in fact, an Ash Pad. It’s just light enough to take along in a padded bag, and has two sides for playing. The wood is gorgeous. Looking at the edge, it reminds me a little of the poured sand sculptures I made at the shore when I was a kid, in tiny bottles that could be sealed up and taken home. 

Ash is a hardwood, which means that when used as a pad base it will provide a feel that is harder and faster, even though the response is still very pleasant to the hands. Sloppy beats have nowhere to hide on this pad. Also, hardwoods darken as they age, lending a beautiful patina to the base over time.


(The Grass Pad is made from hemp fiber, and the difference in appearance is striking. Check it out on the web site for more details. I may still try to find one of these for my collection later on.)

2. Pine Pad. This model was one of Beetle’s first, and remains a staple in their lineup. Using a much thicker (1.5”) base, it’s also a fairly heavy pad, and for that reason is not ideal for travel. (There was once a single-sided 8” model, which I have, but that size is no longer in production. The 8” version travels well and is fun to play.)

The two different thicknesses of recycled rubber offer different feels, though on a base this thick it might be harder to head a significant difference in tone. I have this one set up in a stand right now and have been getting to know it better.


I’ve already reviewed the Carlos Botello signature pad in a previous post, and continue to be surprised at how much I enjoy this model.

3. Tony Teleky Bus Pad. These were designed in collaboration with Tony Teleky, a drum corps alum and current instructor with Carolina Crown drum corps. He shares my passion for sustainability and is a terrific musician. He designed the Bus Pad precisely for the reason the name implies: chopping on a pad on the tour bus. The pad’s dimensions work beautifully in the confines of a bus seat, and allow for easy transport in a backpack.

(When I marched drum corps in the late 1970s, we traveled on school buses and chopped on a pillow on our lap, or on the tall padded back of the seat in front of us. Heavier, marching-specific practice pads did not yet exist. At home, most of us practiced on Remo tunable pads, or a rubber pad like the Ludwig “keystone” model. Kids with money might find a Trankle Pocket Pad, though they were spendy for the time at over $20 each. Many of us made our own pads from a phone book and duct tape, which was good enough in the days of lower-tension Mylar-headed drums. It was, as we say, a different time.)

There are two generations of this pad in existence: the first was a single-sided pad with a solid wood base and 3/16” recycled rubber surface. It was very popular when it came out. The Bus Pad was later revised and the second generation is now made with a Valchromat base and two playing sides: one is made of naked recycled rubber, and the other is recycled rubber with the same laminate as used on the Botello pad. I obtained mine in a straight across trade for another pad. There are a few very tiny dents in the laminate, but only one is really noticeable, and it’s not enough for me to ask for a replacement laminate.

I have been enjoying this little pad a LOT. The playing surface on both sides is very nearly perfect, and positively dreamy for portable chopping on the bus or at the park. The perfect size for travel — this one fits in my bicycle saddlebag!

I may seek out an older version of this pad for sake of including it in my collection, but it’s not a high priority. If one falls into my lap, great. If not, that’s okay too.


4. In addition to these Beetle pads, I also have an original BAP (short for “Big Ass Pad”), made of solid pine and recycled rubber and measuring two feet in diameter. I bought this on sale when the last of them were being offered on closeout. The plan was to discontinue this version because the size wasn’t popular enough for the costs involved in making and shipping it and still remaining competitive.

I’m ashamed to admit that right now, my BAP functions as a bit of a catch-all table in my studio. I hope to rectify that situation soon. 

For quite awhile, there was no word as to whether the BAP’s demise was permanent, or just a long term hiatus.

That question was answered earlier this year when Beetle announced the release of a new version of the BAP, this time made with a Valchromat base and including a smart carrying handle.

If I were holding a monthly pad party in my community (something I’ve dreamed of doing, tried twice and gave up — maybe I’ll try again this fall), I might find the new version of this pad to be a nice thing to add to my stable. If you work with a drumline or afterschool arts program, you might investigate this pad as a useful resource.

I’ve now given myself some impetus to clean up the space a little and use this baby more.


There are so many — probably too many — mass-produced practice pads on the market today, and in my humble opinion, most are overpriced for how they’re made and what you get. (It’s telling that Remo’s tunable pad, first released in the early 60s and still made today in 6”, 8” and 10” sizes, still finds its way into the hands of schoolchildren across the country and around the world — and at a price far more commensurate with its construction cost and long term value. The 8” size, now considered the standard size for student use, retails for around thirty-five bucks. Compare that to the price of a gray Evans pad, with the same retail price of $35, but which is not as durable as the Remo and cannot be refurbished when it wears out.)

All those mass-produced pads have an environmental cost that isn’t taken seriously enough today.
That’s why I try to stick with pads with a higher sustainability quotient, like tunable pads whose heads can be replaced (pro tip: cut up the old head for those little strips to attach the snares to a drum), or pads made more sustainably (like Beetle and, to a lesser extent, Mad Pads, both of which source their components as close to home and/or recycled as possible and use local labor to make them).  

I encourage you to ask better questions about the drum equipment you buy and use, and seek out products that offer as high a degree of sustainability as possible, including buying local and/or used, trading for other gear, and choosing products that are lower on the environmental supply chain where possible.

I’ll share more sustainable drum goodness as I find it.

Friday, August 23, 2024

DIY Drummer: Anyone can make a practice pad out of almost anything

While rehearsing music for Rosh Hashanah and Yom Kippur (in my other musical identity as a cantorial soloist in synagogues), my brain fried and I needed to take a break.

So I made another homemade practice pad from, literally, stuff around the house.

Here are the materials used:

— corrugated cardboard 

— rubber exercise band, approximately 1.5” wide x 1/4” thick

— mousepad/Stackpad material

— plumbers’ tinfoil tape

— gaffer’s tape

— bicycle spokes, saved from a taco’d wheel

— wood glue

— super glue

1. Cut layers of cardboard to desired size (I chose a size of 10” square for easy transportability).


2. Apply and spread wood glue between layers, stack and weight with books and let dry overnight.


3. Apply plumber’s tinfoil tape to top side and smooth thoroughly. Buff the tape gently with sandpaper and set aside.

4. Measure and cut the exercise band into equal lengths, enough to lie side by side on top and create a playing surface.

NOTE: this stuff can be VERY hard to cut, even with sharp industrial scissors. I used an Exacto knife with a brand new blade, and applied a thin dribble of TriFlow chain lube every couple of cuts, using a steel straight edge (and gloved hands!) to keep things even. Still, I struggled and my strips are not perfectly uniform. But they’re better than they would be if I’d used scissors. 

5. Lay the rubber strips across the top of the cardboard platform so they lie flush next to each other, and mark the corners with a pen.


6. Buff one side of each rubber strip lightly with emery cloth or sandpaper. This will help the glue to adhere.

7. In a well-ventilated space, apply super glue gel to the underside of each rubber strip, and pay it glue-side down on the tinfoil taped side. Hold it in place for 10-20 seconds to allow initial bonding before moving on to the next strip. As you add each strip, make sure it lies totally flush beside the previous one. The goal is to use these strips to create a near-solid playing surface of uniform height. It’s not perfect, but it’s close and it works. But you have to work quickly, and immediately wipe away any glue drops that poke above the surface between strips! (Use a rag for this so you don’t get it on yourself or your clothes.)

When all the strips have been glued down, weight down and let dry for 2-3 hours. (Some super glue compounds may take less time. Follow the instructions for the glue you choose.) 

8. Cut mousepad material to a size roughly 1/4” to 1/2” smaller than the size of the cardboard, and apply to the underside of the cardboard platform with super glue. Weight and let dry. (Tinfoil tape on this side is optional. I chose not to use it here, as it’s expensive and because there was a lot of ink used on this piece of cardboard, which I hoped would hinder absorption of the glue gel. It seemed to work fine.)


At this point, the basic pad is essentially done, in that it’s playable.

However, if you leave it in this state it won’t be very durable, even if you only use it at home. The exposed edges of the cardboard will get knocked around, dented or torn. 

The other reason for going a little farther is that in this state, the pad is rather light in weight. I decided that I wanted to add some weight to the pad. But it was already glued together, so inserting a thin metal plate in the center would be impossible.

Instead, I decided to insert bicycle spokes in the holes provided by the corrugated cardboard. I trimmed a bunch to the desired length, getting rid of the heads that would fit into the flanges of the hub (and which wouldn’t fit into the corrugation), and slid one into each hole until I had filled most of two layers of cardboard.
Then, I poured some Elmer’s glue into the holes, with the idea that it would dry and keep the spokes from moving around.

It didn’t work. The glue didn’t reach all the spokes, some of which I’d cut a little too short. When I played the pad in this state, I could hear spokes rattle inside. Along with the extra ounces of weight, I had unwittingly given my practice pad a fake (and admittedly cheesy) “snare” sound. Did I want to try and apply glue at the opposite end?

I decided against that, and sealed up all the sides with heavy-duty gaffing tape. This would protect the edges as well as seal in the spokes. Then, I added some tinfoil tape for additional stability and a bit of bling. So it rattles with a cheesy, fake snare sound. Considering how little it cost me to make this pad, I can live with it.


As homemade practice pads go, it’s certainly one of the cheapest I’ve ever made, in terms of both materials and time. The only things I had to pay money for were the tinfoil tape and the super glue. Everything was a byproduct of something else, like a case of cat food, or an exercise band I’d found in a local “free” box at the curb.

Here are two very short videos of the pad before and after I added the spokes.


Will I make one of these again? Maybe. If I do, I might used corrugated plastic, the stuff that campaign signs are made of; I have a few of those lying around in the shed. I might need to use a different sort of glue in that case, but I’ll burn that bridge if I get to it.

Meanwhile, if you’re interested, there’s a new Facebook group that showcases homemade pads

I LOVE to #makestuffoutofstuff because besides promoting sustainability, it stretches my personal creativity and cites me to consider new possibilities in the way I approach a thing.
Try your hand at making a practice pad from stuff that’s just sitting around at home, and see what happens.
Have fun, and happy drumming.


Wednesday, August 21, 2024

I take back ALMOST everything I’ve felt or said about laminates: Beetle’s Botello signature Pad

If you’re a regular reader here, you know that I’ve never been a huge fan of laminates on practice pads.

Growing up on Mylar, I just never felt the need for adding something  that resembled Formica to what was already a perfectly decent pad.

So over the years, I’ve tried lots of laminated practice pads, and I have found most of them ranging anywhere from pointless to horrible.

I originally tried this pad three years ago, and because at the time I was doing a lot of drumming on older vintage drums with Mylar heads and standard tuning, I didn’t really appreciate the pad at the time.

More recently, I had an opportunity to buy this pad used and decided the price was worth the risk. Maybe my hands and head were in a different place now.

The Carlos Botello signature pad from Beetle Percussion is designed in partnership with percussion instructor, arranger and performer Carlos Botello, who teaches drumlines across the country including the Crossmen Drum & Bugle Corps. He’s also the creator of the multi-volume instructional series of books, The Left Hand Path (which are available online).

Carlos Botello and Bradley Lomax designed a really nice practice pad. You can click on the link that will take you to the Beetle page for this pad and read about the details that go into making it.

Disclaimer: I bought this pad used in a private party sale. The construction is identical between my used pad and the pad currently sold at Beetle’s web site. My pad is an early iteration of this model and lacks the graphics on the top laminate, but otherwise it’s the same pad.

My pad has been through the wars a bit — dropped, scuffed, played a fair amount (though happily, my laminate has no dents in it) — but works as advertised.

The top of the pad has a 1/4” thick recycled rubber surface, covered by a Mylar laminate. One might think that this is just another hard, unforgiving Formica-like playing surface, but they’d be wrong. 

This side plays like buttah.

It’s soft enough that the laminate offers useful articulation instead of undue resistance. The Valchromat base is more durable than MDF and if you drop it, there’s no surface paint to scrape off because the fibers of the Valchromat are impregnated with the plant-based color all the way through.

The rubber rim is soft, but embedded deeply into the base so it will stay put, and gives just enough presence for you to know if your rim shots are accurate or not.


The bottom surface includes Carlos’ signature and a 1/2” thick layer of dense, soft foam. This side is meant to give you a place to build your wrists and get a good workout. There is almost no rebound at all, which makes it similar in intent to the pillows we used to practice on while on drum corps tour, and when you play on normally-tensioned Mylar heads, such workouts make sense.

If I were still possessed of younger, stronger hands and not bothered by advancing osteoarthritis, I might find this surface useful in my practice. But working on such a surface now would actually be quite painful and potentially harmful for my hands and wrists, so I will likely just avoid this side completely. 

(NOTE: I’ve reached out to Beetle Percussion and asked about the possibility of swapping in a non-laminated recycled rubber surface to replace the foam. If they can cut a Floppy Disc to match the shape on the underside of the Botello pad, swapping the two shouldn’t pose a problem, and I can do the swap myself.)

I think the combination of the recycled tire rubber and a real Mylar laminate (similar to what’s used to make a drum head, though perhaps a little thicker) makes for an ideal practice surface, especially for Rudimental and marching applications. It’s articulate without being harsh in feel or sound, and the surface will indicate your accuracy immediately without hesitation.

Having tried other Beetle pads with a rubber rim, I can say that the rim is a little soft for my liking, and I wonder how long it will remain durable enough to help me gauge my rimshots. Because this pad is so used, I may stiffen the rim a little by adhering a very long zip tie to the outside wall of the rim. I’m waiting to hear back from Bradley at Beetle for his thoughts first.

The pads are currently available at the Beetle web site, but be warned: high-craft pads like this are made one at a time and you could be waiting a month or more for yours to arrive. Also, pad models are made on a rotating cycle (because the cutting machinery must be reset for each pad’s thickness and diameter.

Various models of Beetle pads go in and out of stock depending on the model schedule, so if a model is out of stock, contact Beetle and ask when it might be available again.

Beetle is my absolute favorite American practice pad maker today, because they pay attention to their impact on the environment and do all they can to reduce negative effects by incorporating as many sustainable manufacturing practices as possible. This does make their craft-made pads more expensive than mass-produced rubber-on-wood pads, but in my humble opinion it’s worth the extra cost.

This Carlos Botello model could became my new favorite rubber drum pad for awhile.

Sunday, August 18, 2024

Under The Hood, part deux: is this pad REALLY worth A HUNDRED BUCKS?

This makes SEVEN that I’m aware of. In less than a month.

Bad batch? Bad packing? Bad packaging at the factory?

We will never know, because VF is a juggernaut with guard dogs on the socials who are shouting in defense of the new pad. I got dressed down by one of the pad’s designers for my previous article, and anyone who is complimenting the pad is getting all kinds of bro love from him on the same sites.

But if this is happening again and again, then the pad really isn’t worth A HUNDRED DOLLARS. 

I stand by what I researched and wrote previously. No apologies. If you are going to charge a hundred bucks for a practice pad, it had better be consistently amazing, and made of sustainable materials.


Friday, August 16, 2024

Under The Hood: What is MDF, and why should you care?

If you're a regular reader here, you know that I've occasionally referenced MDF as a component of modern practice pad manufacturing.

What IS MDF?

It stands for Medium-Density Fiberboard, which is a material often used as the baseplate material for modern practice pads. It's also used in flooring and furniture manufacturing. Because it's a wood product, rather than real wood, it's more resistant to pests like termites and ants, which is especially important in home construction** and repair.

A good basic examination can be found here: https://en.wikipedia.org/wiki/Medium-density_fibreboard

There have been concerns raised about MDF in multiple industries, including drum pad manufacturing, and with good reason. regular MDF requires chemicals to ensure proper adhesion of its multiple ingredients and one of those is formaldehyde.

What is formaldehyde?

Formaldehyde is commonly used as a preservative in medical laboratories, mortuaries, and consumer products, including some hair smoothing and straightening products. It is also a by-product of automobile combustion and is produced in very small amounts [emphasis mine] by most living organisms, including humans.

Formaldehyde is used in the process of embalming bodies to prepare them for burial.
(Side note: Jewish religious law prohibits embalming, in accordance with the belief that the body should not be preserved when the soul is done using it. So when I die, my body will decay faster. I'm fine with that.)
It is also used to preserve body parts in laboratory jars. (Remember the "Abby Normal" brain scene in Young Frankenstein?)

The fact that it is used in hair products horrifies me. While humans produce tiny amounts of this stuff, what's found in hair products is in a more concentrated form and therefore should be suspect by anyone wishing to avoid consuming quantities of it on purpose. There's currently a huge brouhaha in the Black community among folks who were told for years that hair-straightening products were totally safe, but whom have experienced a noticeable spike in certain kinds of cancers after regular use of such hair products over an extended period. That should tell you something.

But I digress.

MDF is a popular choice for most pad manufacturers because it's cheaper than whole wood, and because it's less prone than whole wood to things like warping and natural flaws in the grain, which have to be removed and/or otherwise worked around at greater cost. MDF is easy to shape uniformly, and it takes paint beautifully.

Depending on the mix of ingredients (which, along with formaldehyde and other chemicals, also includes pulverized wood fibers, wood resins, and wax), it can be made in different densities and degrees of flexibility; however, most MDF is made to approximate the rigidity of natural wood.

But MDF has a much higher concentration of formaldehyde than the average human body, and releases that formaldehyde in the form of off-gases that can last indefinitely. Surface paint will seal off some of the formaldehyde for awhile, but eventually it does seep through. I can only imagine what it would be like to work in a warehouse where thousands of pads are stored, awaiting shipment. I don't think anyone has measured the seepage rate of offgases in a meaningful, verifiable way yet. But when they do, I'll certainly pay attention.

So many modern practice pads are made with MDF baseplates that it would be easier to note which ones aren't. And while it's easy to differentiate among brands of modern pads, it's worth noting that there are likely only a few overseas factories actually manufacturing all those pads.

Branding is not the same as manufacturing.
Want proof? Xymox made re-branded pads for  other drum companies for years. Offworld has done so in more limited quantities (Remember the yellow Lone Star pads? Apparently, those are a hot collectible right now.) The Chinese juggernaut HUN has been making pads right and left for Salyers, RCP and many other drum companies.

I've owned and used some of these pads myself over the years. But once I began reading up on MDF and what it actually is, my ownership and usage of these pads fell off considerably. Most of my "modern" pads are older and in used condition, so the worst of the off-gases has likely gassed out. But still.

Another issue with pads using MDF basesplates is durability. The less dense the baseplate is, the more prone to damage it is in a fall or other sudden impact. RealFeel pads have shown evidence of such wear and tear over the years; take a good look at the corners of any RF pad that's twenty years old and has been through the wars. So have older Xymox pads, from their rubber-on-wood days. Interestingly, the baseplate on a recently acquired NOS (ca. 2000?) Xymox shows evidence of a woodgrain on both sides of the pad. This could likely be a veneer laid over the MDF, or it could be really sloppy brushstrokes. I'm opting for the former until I can find out more. In any event, the baseplate on my NOS Xymox feels heaver and more dense than the one on my pre-2023 VF Stockpad.
As with all things, Your Mileage May Vary.

Here are photos of brand new Heavy Hitter pads from Vic Firth, released this summer. Both of these photos are from drummers who opened the box after receiving it in the mail, only to find that the MDF baseplate was split right through the middle, likely the result of being knocked around during shipping. (And we all know how brutal UPS can be.)


Hopefully, these buyers can get free replacement pads and therefore a good outcome.
The fact that this pad retails for a hundred dollars gives me pause. The fact that the baseplate can be damaged so easily because the material is less dense than actual wood convinces me that I should probably save my money.

Alternatives to MDF

There are a few alternatives to MDF, though they are not cheap.

1. Real wood. Beetle Percussion offers craft-made practice pads using whole wood (pine or ash) salvaged from trees killed by invasive beetles (hence the company name). The playing surface of Beetle pads comes from recycled tires. I own a couple of Beetle pads made this way and I like them. The real wood does offer a different feel that some may not like, especially if they're used to MDF pads. There is a little less shock absorption with real wood, and more of the vibration of each hit will be felt in your hands. For some, that's uncomfortable. For others it's useful information about the clarity and timing of each drumstroke. This issue seems to be somewhat mitigated by using a thicker slab of wood for the baseplate. You'll have to decide for yourself.

Beetle has also experimented with Hemp wood, which has a texture and feel closer to grass. When compressed and turned into board with a plant-based adhesive (as opposed to the chemicals found in MDF), it can be rather heavy, but durable. Best used in smaller diameter pads.

2. Premium MDF -- I just learned about this option from Michael at Mad Pads (stay tuned for an interview coming later at this blog!). It's apparently somewhere in between regular MDF and actual wood in terms of both price and environmental health, using far fewer chemicals and still having the ability to be cut, shaped and painted easily. I am still researching this option and will report back.

3. Valchromat -- this is a material constructed similarly to MDF, using compressed and glued fibers. It was developed in Europe as a stronger and more environmentally sensitive alternative to MDF:

Valchromat is an environmental friendly non-toxic substance made from recycled pine wood and mill waste. Valchromat panels are manufactured using waste wood such as branches and chips from softwood forests. In using waste wood Valchromat helps to sustain forests and minimize carbon emissions given off from felling machinery. Also the carcinogenic odorless chemical gas known as formaldehyde which is found in the wood fibre bonding resin used in standard MDF is absent in Valchromat where a special organic non- toxic wood fibre bonding resin is used allowing Valchomat is safe to be used in the manufacture of kids toys. Valchromat also use the same colour dye used in fabric. This dye is organic and non-toxic.

(from the Valchro web site)

Beetle Percussion uses Valchromat as the baseplate material in some of its pads. The vegetable-based color is impregnated into the material, eliminating the need for paint; and the lack of formaldehyde is a fantastic development.

The downside of Valchromat is that it's very expensive. Hopefully, as more industrial uses are found for this material and its use becomes more widespread, costs will eventually go down.

Is ANY amount of formaldehyde in MDF okay?

Good question. For a possible answer, I found this:
https://www.realtor.com/advice/home-improvement/what-is-mdf-furniture/

Read it, think about it, and do your own research.

In an age of faster access to information, it's easier than ever to learn about the details that go into the drums and accessories we use. If you're curious and want to go deeper, I invite you to see what you can find.

Happy drumming.

(** I live in a very little house that was built in 1906 and last remodeled in 1948. So the incidence of construction-based MDF in my house is pretty low. Just sayin'.)