Saturday, February 27, 2021

Future Vintage: Gretsch custom tunable practice drum, 2018

For a short time in 2018, Gretsch produced a specialty "practice drum" and sold it through one dealer, the Memphis Drum Shop. It was an interesting but short-lived idea: A limited supply of the drums were made with a choice of either polished natural wood or a white marine pearl wrap.

At the time, I was somewhat skeptical: when I could make my own practice drum on the cheap from cast-off parts, why would I spend three hundred dollars on one?

But then, the drum disappeared as quickly as it had come on the market, in a little under a year. And all information about the drum disappeared from both the Gretsch and Memphis Drum Shop web sites.
I'd never seen one in person, and remained curious. Then, someone offered one online for sale at a reduced price, I was flush from the recent sale of a high-end bicycle, and felt like I might want to have one in my practice pad collection. The seller and I agreed on a price and it was mine.

When it arrived, it was in nearly-new condition. The natural wood finish was lovely to look at. The inside of the drum shell was painted gray and had a Gretsch sticker applied. The classic round badge was applied, and the rim was engraved or stamped with the Gretsch brand as well. In short, whatever this thing was, it was beautifully appointed.


From the Memphis web site (whose Marine Pearl version is shown at left), I was able to learn how the drum was constructed, and my model bore everything out:
(from the Memphis Drum Shop web site: "The 12" Gretsch USA Custom Tunable Practice Pad looks and feels like a real drum. It’s perfect for practicing rudiments, snare pieces, and rimshots. This drum features 5 Classic lugs, Gretsch 302 hoops, Gretsch Round badge, and Remo Coated Ambassador drumhead. This practice pad has a white marine pearl finish or natural wood with chrome hardware. Other Gretsch USA Custom finishes available by special order.")

The ad copy doesn't mention it, but beneath the Remo drumhead is mounted a hard rubber material mounted on a wooden disc, that serves to provide the muffled tone and additional rebound of a practice pad. However, it's not nearly as muffled as you'd expect because of the additional resonance provided by the wood shell.

(Photo at left from Memphis Drum Shop)

Here are a couple of short videos demonstrating my practice drum with both sticks and brushes.


What I noticed right away is that, while the coated head does indeed provide the feel I like for brushwork, the muffling provided by the rubber pad means my brushwork sessions are VERY quiet. They're also a little restricted by the pad's 12-inch size; brush patterns utilizing the full surface of a 14-inch head will need to be readjusted for a smaller surface, which may or may not pose an issue for some players.
Playing on this surface with sticks doesn't really break any new ground for me; the surface sounds pretty much the same anywhere in or near the center of the head. Playing near the rim offers a reduction in vlume and a slight change in tone, but as this is a practice pad the whole point, is, well, chopping. I guess.

Honestly, the more I hang out with this thing, the less it seems to serve a genuine musical purpose and the more it seems to exist as a short-run vanity item. And so, unless I hear differently from Gretsch (to whom I've sent an email of inquiry), my initial skepticism was probably well-placed.
Still I am glad to have this in my collection. It's a beautiful oddity and that alone makes it interesting for me. If I hear back from Getsch, I'll update this post.

Happy drumming.

Saturday, February 20, 2021

A little update on Xymox Percussion: Where's Waldo?

Those of you who remember my last review of a Xymox product, may recall that in the end, I was so singularly unimpressed with it I ended up selling it, still in the box, to someone else.

I hope he's happy with it, because the future of the company remains unclear.

If you want the full, sordid story, you can avail yourself by checking out the FB group, Xymox Percussion - Buyer Beware. In short, the owners have fled souther California and moved to Washington State, where operations have resumed, purportedly in a large garage somewhere in Yakima.

Meanwhile, dozens of Xymox pads are now popping up on web sites like eBay, Offerup and Mercari. Barely used tenor pads are selling for between $150 and $200, while Reserve Snare pads in various states of usage/damage are going for as little as $40. So even if the company is still trying to ship new product (including orders that are up to a year overdue), the offloading of so much product all at once could combine with the growing mountain of complaints to devalue the Xymox brand.

I own two Xymox pads as part of my collection, and will likely keep one of them for the long term.

This one, an early-generation Rubber pad with "snare" sound, probably dates from just after Xymox patented its "snare" sound mechanism in 2000. I used this pad in the studio when recording drum tracks for The Watchman's Chair in late 2019, and I still enjoy playing it.

It's a great little pad, it travels well and the rebound is pretty satisfying for an early-2000's pad in the Kevlar era.

I choce it for the studio recording because the volume would be easier to control underneath vocals and guitar.

The other pad I still own is a later-era Reserve pad -- though curiously, this one does not have the "snare" sound mechanism.
It's just a very heavy practice pad with a thin rubber surface covered by a carbon fiber laminate.

In this case, I bought the pad used, and when it got to me, I discovered that the laminate was no longer glued down securely. So I could lift it off and just play on the rubber, which gave a different feel and sound.

But in the long run, I don't see any reason to keep this pad, and I will probably re-home it at some point.

And therein lies the challenge with owning a Xymox pad. It's a marching-specific pad for those who play exclusively on Kevlar-carbon heads at a very high tension. If you play a drumkit, or an older-style marching drum with Mylar heads, the laminated Xymox pad won't be very useful for you. It's designed for modern marching drummers, and marketed to young people in high school and college drum lines. Unfortunately, Xymox failed to understand that a high school drummer atracted to the color and style of their pads wouldn't necessarily find the wait-time attractive. Young people expect timely delivery, and if they don't get it they often move on to something else; a LOT of young marching drummers have done just that, choosing to buy a pad they wouldn't have to wait months or even years for.

A number of consumers -- mostly very angry parents who shelled out to buy the practice pad of their child's dreams -- are gathering online in chat rooms and groups to discuss the possibility of assembling a class-action lawsuit against the company. Meanwhile, young drummers who managed to get -- and wear out -- their first Xymox pads are selling them and buying something else (two of the most popular brands besides Xymox seem to be Offworld, whose pads are in high demand among college and drum corps players for their durability; and Beetle, a small-batch company making pads from recycled tires in the United States. For drummers on a budget, the Evans Real Feel is a fine practice pad that offers slightly more versatility than these aforementioned marching-specific pads).

So it remains to be seen what will happen with Xymox Percussion and their legal and financial issues. I'm not holding my breath, and probably won't keep more than one Xymox pad in my collection going forward.

Friday, February 19, 2021

Product reviews: Drumeo practice pad, Diamondback sticks

First, a reminder: so far, no one has ever offered to give me free product to try out.
Everything I review here is something I purchased either at full or discounted cost, and then ran through its paces on my own dime.
If a drum company ever wants to reach out to me about reviewing their products, they can find me here, on Facebook and on Instagram.
If you're a regular reader of my blog and you think I should review a particular product, please invite the maker to reach out to me on Facebook to start the conversation -- and let me know if I may credit you publicly for playing matchmaker. Thanks!


Today I'm offering a two-fer review.

First, I've begun the process of winnowing down my stick holdings -- and preferences -- because the Crohn's-related arthritis in my hands has proigressed to the point where, in order to keep playing, I have to use smaller sticks. For now, I'm looking at "Concert"-specific sticks from companies like Vic Firth and Promark, and also testing every 2B stick I can get my hands on to see what I'll like the most. In the meantime, I've been re-homing my fatter marching sticks a few pairs at a time, because I just can't play for long periods with anything that beefy anymore and I want to keep playing for as long as I can.

Not all 2B sticks are the same. Besides differences in length of taper and the shpare of the tip, there are differences in diameter and wood density as well. A company that can maintain a reasonable consistency of weight and pitch gets points in my book, which is why I avoid companies that make custom sticks in very small batches. Dialing in that kind of consistency requires larger production runs and dedicated quality control people. For a small company to maintain that kind of consistency they would have to charge a lot more per pair, and at that point small-batch sticks become a boutique item and not something to have on hand in quantity.

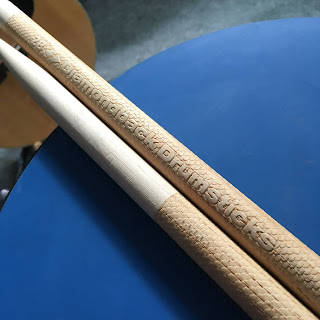
Diamondback drumsticks have intrigued me for awhile now, because of positive reviews from a couple of friends who like them and because they look so clean and consistent.  So I went ahead and ordered a pair of 2B's.

Diamondback intentionally creates a snakeskin-shapedtextured surface into the grip area of their sticks for improved grip. The texture also feels nice in the hand, and the textured grip makes sense; I can certainly feel the difference in my hands at the end of a practice session with these sticks. After 45 minutes of woodshedding, my hands don't feel quite as tired because I haven't had to grip the sticks as tightly to hang onto them.


Like most sticks labeled "2B," the diameter is .630", which is the standard for the size. But I would really like to see a diameter in between their 2B and their 3S (which I also tried and found to be similar to modern drum corps sticks in the .695 to .710 range, all too big for my hands). I've contacted Diamondback to see if they would ever consider a middle size, and I'll wait to see what they say.

The tip of this stick is a little unusual in that the sides are conical and flat, rather than rounded. If I had to guess, that may be to ensure that the center of the tip won't wear down faster. But unless you're aiming for utmost accuracy in every stroke you won't land the flat side the exact same way every time. My preference would be to round out the sides of the tip a little bit for a more natural contact surface and sound.


Finally the un-textured portion of the stick is clean and tight-grained, meaning this is a great example of a dense hickory that's perfect for drumming with.
I'll be hanging out with these a lot in the coming weeks and see what Diamonback has to say about possible new stick sizes in the future.

*****     *****     *****

Turning my attention to practice pads, I've been enjoying my workouts on this basic pad from Drumeo. Drumeo is primarily a studio of instructors offering instruction for various styles of drumming. But in their shop they also offer this simple two-sided practice pad, which you can buy without signing up for lessons if you wish.

The primary practice side of the Drumeo QuietPad is made of a blue silicone material that provides enough of a satisfying bounce for working on specific charts, or on rudiments at full speed. It's comfortable without being wildly over-bouncy and out of control, and therefore excellent for daily practice. I would suggest that this pad is better-suited for folks who play drum kit, or who play marching drums with Mylar heads. Anyone playing primarily on Kevlar will want to keep looking, because this pad will not simulate the feel of a high-tension Kevlar head.


The other side of this pad features a thick, much softer foam surface that's ideal for slowing down and really focusing on technique. The dense, black foam is not unlike what companies like Reflexx are offering for far more money. It's a playing surface that requires you to pull your strokes out of the surface, just the way so many of us learned to do on Mylar marching heads back in the 60's and 70's. (When I marched in drum corps in the late 70's, we had to bring a pillow from home, not only for comfort while we slept but also for woodshedding our parts with NO bounce. It was, as they say, a different time...)


Sandwiched between the two playing surfaces is a basic compressed wood fiber platform that's more than adequate. At 11" in diameter, this pad won't fly around the tabletop from accented notes, and fits easily in most modern snare drum stands.

While It doesn't take the place of my heavier-duty RD Chop Pad for most of my heavy rudimental work, the QuietPad has found a place in my studio as both a great alternate workout pad (especially the softer side) and a very portable pad for bringing along to rehearsals or a park bench. If you're on a lighter budget and this is your only pad, it's not a bad choice at all.

Videos of both sides.

Blue side:


Black side:


Wednesday, February 17, 2021

Vintage Corner: 1961 Ludwig "Cub" marching snare drum, 13 x 9"

Today I took delivery on a drum that a guy back east was letting go of, as he pared down his collection of drums in retirement. He was very happy to hand it off to me, because he'd read my blog and FB posts and understood that I would give it a good home.

It's a a 1961 Ludwig Cub, a model that first came out in the mid-1950s and continued to appear in subsequent catalogs through 1977. Based on the badge design that shows up in the catalogs, I'd have to guess that my Cub was made sometime between 1960 and 1967. It could have been made earlier but the badge design doesn't support that hunch, especially since the first Cub was produced with a WFL badge (before the Ludwigs were able to buy back the rights to use their name when Conn let go of the Ludwig product division in the mid-50's).

(from the 1964 Ludwig catalog)


It took some effort, but I found the date stamped on the inside of the drum.


It's certainly in better shape than the Slingerland I recently repaired and rebuilt.


The most curious thing about this drum is that Ludwig chose to leave the strainer alone throughout its production history.

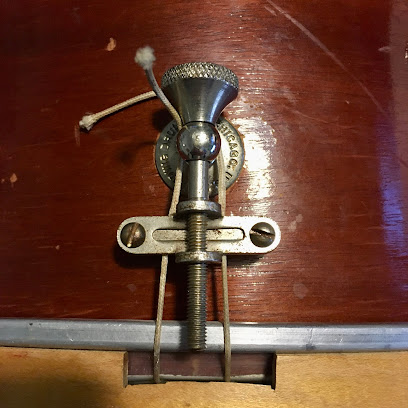
Even when the drum's badge changed in the 1970s (to the classic Blue and Olive badge of my high school years), the strainer never had a throw-off lever added.

Why? The twist-tension strainer was old technology, old past the point of common sense.  What was the point of continuing to offer such an outdated drum?

The only logical answer I've been able to come up with is similar to the one that is often the case with practice pad designs that have been carried through a decade or more of catalogs: the model wasn't a huge seller in its alter years, and Ludwig had backstock it need to move. It's highly possible that the latest years of the Cub's offering may have included drums made several years earlier and had the badge changed, though I'm not sure how I could confirm that.


Since the drum came to me with all original parts, I'm going to leave it alone for now.  When the weather warms up just a little more, I'll think about whether or not I'll choose to change anything out and make it a serious player. Since the Slingerland drum can fulfill that role, this may be a drum I leave as is for the long term. But it is a really sweet little drum and I am happy to give it a home.

Friday, February 5, 2021

Vintage Corner: Slingerland drum UPDATE 3

Yesterday and today, I hurled some love at the rims and the shell.

The drum came to me last summer in pretty bad shape. After careful cleaning, the rims shows fatigue in several spots and the shell had been gouged pretty badly in a couple of spots. I had to decide how much time and effort I wanted to invest, and wheter of not it was worth it.

In the end, I chose a compromise.

Since the shell and rims were still pretty nicely round, I decided to honor the "beausage" (literally, "beauty through usage") the drum had acquired over the decades. After repairing the worst of the cracks (which I did with R's help), I decided I would lightly sand some of the roughest spots, leave the old varnish on everything else, and cover the sanded spots with some clear nail polish. It's not what a real woddworker would do, but I'm not a woodworker and decided that the drum looked more beautiful with its war wounds. (I certainly didn't want to cover the beautiful wood with colored paint! And I couldn't justify the cost of NOS wood hoops for a drum so beat up.)

The rim repair that Ron had helped me with has held nicely, supported by the pieces of bicycle spoke I inserted. All that remained was selective sanding and varnishing with clear nail polish.

The batter rim was marked with spots where the hooks had gathered rust underneath, which had soaked into the wood. Sanding would remove more wood before it removed the rust stains, so I sanded lightly and then varnished with nail polish.


The shell posed another aesthetic challenge because a previous owner had gouged it, maybe with a belt buckle while marching.
The gouging had worn through multiple layers of the ply, and while there's still plenty of wood there, filling the depression with wood putty would have been more of a headache than I was prepared for. (I just have a little Tuff-Shed where I fix bikes. Not roomy or fancy.) So I sanded the area lightly to smooth it out a little, cleaned it, and then applied more nail polish.

The nice thing about nail polish is that it fills the grain nicely, and dries quickly between coats

The other thing about mahogany is how it shines when the light catches the grain, even when it's been banged up.

The shell just glows, in a way it didn't when I first got this drum.

That's why I chose to let the drum keep its patina, earned through a hundred performances and a thousand rehearsals, played by any number of hands.

This one's a keeper, and I can't wait until tomorrow to sling it up and try it out.
Video coming soon.
Below: Before, and after.


Wednesday, February 3, 2021

Vintage Corner: Slingerland Drum UPDATE 2: Rims and shell

Since I was gifted with this drum last summer, here's the progress:

1. I took it all apart so I could begin to clean the hardware and repair the cracks in the snare-side maple hoop.

2.  I gave the bottom hoop to my brother-in-law, a woodworker, so he could soak it and bring the cracked section back into round with the rest of the hoop. This process took a couple of weeks.

3. While I waited for that piece to get finished (in between Ron's professional woodworking jobs), I cleaned the rods and hooks using a Rust Remover stick and finishing with some Nevr-Dull.

4. I got the hoop back from Ron, and finished the repair by adding sections of bicycle spoke to strengthen the repaired crack. I also began removing the tape residue from the rims and shell.

First, the snare hoop. The repair looked pretty good, nice and solid; but Ron advised me that without adding some internal supports it would eventually weaken and break again from tension and repeated playing. So I found a drill bit the right size and carefully drilled two tiny holes through the center of the rim, across the repaired crack. Because the other side of the hoop was showing the beginning of the same fatigue, I drilled holes there too.

The holes were run directly crosswise through the crack and the glue used to repair it.


Then, I took an old bicycle spoke and measured off sections long enough to run through the hoop, with perhaps a couple millimeters counter-sunk on either end.
I checked my work by running a spoke through the hole. It fit perfectly.

Then I measured sections of the spoke and cut off four pieces.


I squirted super-glue into each hole, chased it through with a section of metal spoke, and made sure each end was slightly counter-sunk when finished. Then I set the hoop sideways to allow everything to dry overnight. (By using a thicker gel instead of liquid glue, I was assured that glue would not drip out all over the place.)

The next morning, everything looked fine. I'll need to decide whether or not I want to try and fill in the ends with some wood putty, or just let it be.


Then I turned my attention to removing tape residue from the shell. A friend in Seattle had given me a bottle of an environmentally-friendly solvent called "Best Cleaner Ever," and I tried it.
Following the instructions, I sprayer a little on, let it soak in for a few minutes and then tried to wipe it off. It did nothing to remove the residue; and in fact the solvent itself had to wiped down thoroughly with warm water to remove its own residue. In the end, it may have loosened the tape residue, but that masking tape had been there for fifty or more years, so it's hard to know. I had to carefully scrape it away with a pocket knife, applied gently enough to remove the tape without gouging the wood underneath.

When I was done, I was left with a shell that still show signs of use and abuse, but the luster of the mahogany also showed up nicely. So I've chosen to leave the shell alone, not removing the original clear paint. I will apply some clear coat to the spots or bare wood that need it, and let the "beausage" be a part of the drum's look. The mahogany itself is gorgeous enough, even with the damage.


I still have some residue to remove from the batter hoop tonight. After that, I'll probably sand both hoops lightly, apply something to seal the bare wood spots, and let it all dry for a few days.
Then I'll begin reassembling the drum.
I don't plan to use a leg rest with this drum, but will instead just let it hang against my leg at a tilt. It will be a fair-weather drum only, or if I use it indoors it will be on a stand.
This was an unexpected gift and I'm glad I've had time to learn from repairing and rebuilding it.
Next: video of the finished drum. Coming soon!

Vintage Corner: Bower pad, replica

The first U.S. patent granted for a drum practice pad dates to 1920, for a design by H. A. Bower.

Before this, drummers generally made their own practice pads, or simply played on the tabletop or whatever horizontal surface was handy. Since they were playing on calfskin heads, the idea of using a piece of tanned leather as a playing surface for a portable pad wasn't a stretch. Bower was the first on record to apply for a U.S. patent for such a device.

Here's his design:

As you can see, it's a pretty simple, even crude, design by modern standards. A wooden board is cut to a desired size (in this case, a 12" round). A smaller piece of thick tanned leather that fits inside the diameter is selected, holes are drilled in both and the leather is affixed to the board with string or a shoelace. According to the notes submitted with the patent application, a thin layer of stuffing may be placed under the leather for a slightly softer sound, which would come in handy if you're practicing while on tour.


Scouting around the interwebs, I found that someone had already tried making a replica based on the notes from the patent application.

He also affixed a copy of the label from the first mass-produced version of this pad, licensed to and sold by Art Higman in Los Angeles in the 1920s.


I was curious about how such a pad would sound and feel, so I decided to make one for myself and find out. It was simple: A piece of scrap wood (Mine is about 8.5 inches in diameter because that's what I had on hand), a piece of tanned, undyed leather about 6 inches square and 1.5 mm thick, and a layer of wool batting roughly 3m thick sandwiched between. Holes were drilled in the leather and wood to line up properly, the batting was cut a little narrower to fit in between, and the whole thing was bound together with a shoelace. I also photocopied a picture of the label and glued it on the bottom.

(NOTE: After putting together, I realized that the additional single hold on one side may have been for purposes of increasing the tension on the shoelace, and thereby possibly tightening the leather against the platform a little more. I'm not sure, but next time I get out my drill, I may add that hole and relace the whole thing and see what happens.)

Considering the simplicity of the design, it seems doubtful that such a device would be awarded a patent today. But back in 1919 when the application was filed, the patent office probably hadn't seen or thought about anything like this before.

Here's my replica pad: 


And here's a very short video of my trying it out, first on top of a regular pad and then on my lap (because the pad kept creeping on top of my other pad):


The feel is actually not that bad. When you remember that a 1920 drummer would use this for quiet practice and then play on a drum with a calfskin head, the feel is probably just about right. Lower-tensioned drums of this era would require the player to "pull" the strokes out of the drum, a technique that is not required (or useful) on high-tension Kevlar-headed drums today.

The shoelace prevents a flat, flush connection between the bottom of the pad and the head of a drum, which may be why there's significant "creep". However, a 12-inch pad could also be mounted on a drum stand with pretty good results, provided it could be secured tightly in the basket.

I'm glad I did this, as the experience gives me more information about drumming technique and practice approaches from this era. However, I'll be content and not try to make another in a 12-inch size for now.

Happy drumming.